
monetize to earn yours

Tuesday, March 30, 2010
Use registry shortcuts to disable and enable screensavers in Win XP
The steps in this tip will show you how to edit the registry for a time-saving shortcut for enabling and disabling your screensaver.
When you perform maintenance operations such as defragmenting or backing up the hard disk, you probably disable your screensaver before you begin to prevent it from interfering with the maintenance operation. However, disabling your screensaver manually is a multistep operation that involves accessing the Display Properties dialog box, navigating to the Screen Saver tab, and setting the screen saver to None. Then, you need to re-enable the screen saver after you complete the maintenance operation.
Fortunately, you can automate the disabling and enabling screen saver procedures with a couple of registry shortcuts. Note: Editing the registry is risky, so make sure you have a verified backup before making any changes.
Here's how.
1. Launch Notepad and type the following four lines. (Note: The second line must be blank.)
Windows Registry Editor Version 5.00
[HKEY_CURRENT_USER\Control Panel\Desktop]
"ScreenSaveActive"="0"
2. Save the file to your desktop with the name Disable Screen Saver.reg.
3. Change the 0 to a 1 in the fourth line.
4. Save the file to your desktop with the name Enable Screen Saver.reg.
Now, when you need to disable the screen saver, just double-click the Disable Screen Saver.reg shortcut. To enable the screen saver, double-click the Enable Screen Saver.reg shortcut.
When you run either of these files, the Registry Editor will display two confirmation prompts—one before making the change and one after making the change.
Monday, March 29, 2010
How to Reset Canon iP1880, IP 1100, iP1800 and iP2500 series
his tutorial solutions to reset canon iP 1880 or canon iP1800 series and work also in canon pixma iP1100, canon pixma iP2500. before reset using general tools you must reset the printer hardware. This way cannot to change ink level status canon pixma iP1880. following tutorial and software resetter to reset Canon Pixma iP1880.
Step 1: Reset hardware
- Press Resume button hold for 1 – 2 minutes
- Open the cover
- Release the catridge and then put catridge again
- Close The Cover
- Turn Off
- then Turn On again
Step 2: Reset Software using general tools
- Download software resetter or general tools for canon pixma iP1880 :Download service tool for Canon iP1880
- Driver should have been install correcly.
- Connect USB cable.
- Before connect power, press and hold power button then connect the power.
- At the same time Hold power button, and press reject button for 2 times then release power button.
- Run software resetter for canon iP1880.
- Don’t forget to open lock release in the software. ( note : to view locK release menu, min resolution 1024 x 728)
- Then select Set Destination to iP1880
- Check CLEANING and EEPROM CLEAR
- Click MAIN and PLATEN
- Finally test print by click TEST PATTERN1.
Note : for permanent reset waste ink canon iP1880 Printers pls, resetting use software resetter. Above way can be used at canon IP 1100, iP1800 and iP2500 series
MP150, MP160, MP170, MP180, MP450, MP460. RESET TOOL
The program is designed for service works with the printer Canon MP-Series Low-Level mode at the moment are supported: MP150, MP160, MP170, MP180, MP450, MP460.
- Expanded information on the level of ink in the cartridge and containers for the waste of ink.
- Reading, recording and reset the printer EEPROM.
- Resetting counters level black and coloured ink cartridges. Clear the counters occupancy “core” and “supplementary” containers for the waste of ink.
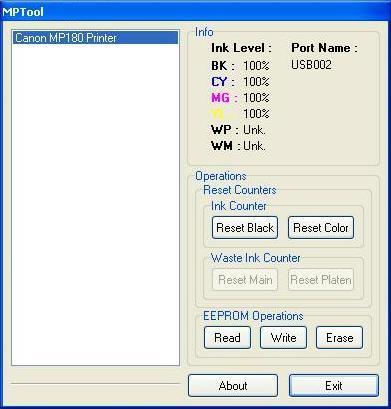
Info Section.
Ink Level – shows the level of occupancy ink:
BK – black cartridge.
CY – colored ink cartridge Cyan.
MG – colored Magenta ink cartridge.
YL – Yellow colored ink cartridge.
WM – “core” container for the waste of ink.
WP – “additional” container for the waste of ink.
Port Name – displays the name of the printer port on the system.
Operations ection.
Subsection Reset Counter – Ink Counter.
Reset Black – zeroing meter level black ink cartridge.
Reset Color – zeroing meter level of colour ink cartridge.
Subsection Reset Counter – Waste Ink Counter.
Reset Main – zeroing meter level occupancy ink “main” containers for the waste of ink.
Reset Platen – zeroing meter level occupancy ink “additional” container for the waste of ink.
Subsection EEPROM Operations.
Read – reading EEPROM *. bin in the printer file.
Write – Record *. bin file in EEPROM printer.
Erase – zeroing EEPROM printer.
Download Current version: 0.9.2
MP150, MP160, MP170, MP180, MP450, MP460. RESET TOOL
The program is designed for service works with the printer Canon MP-Series Low-Level mode at the moment are supported: MP150, MP160, MP170, MP180, MP450, MP460.
- Expanded information on the level of ink in the cartridge and containers for the waste of ink.
- Reading, recording and reset the printer EEPROM.
- Resetting counters level black and coloured ink cartridges. Clear the counters occupancy “core” and “supplementary” containers for the waste of ink.
Info Section.
Ink Level – shows the level of occupancy ink:
BK – black cartridge.
CY – colored ink cartridge Cyan.
MG – colored Magenta ink cartridge.
YL – Yellow colored ink cartridge.
WM – “core” container for the waste of ink.
WP – “additional” container for the waste of ink.
Port Name – displays the name of the printer port on the system.
Operations ection.
Subsection Reset Counter – Ink Counter.
Reset Black – zeroing meter level black ink cartridge.
Reset Color – zeroing meter level of colour ink cartridge.
Subsection Reset Counter – Waste Ink Counter.
Reset Main – zeroing meter level occupancy ink “main” containers for the waste of ink.
Reset Platen – zeroing meter level occupancy ink “additional” container for the waste of ink.
Subsection EEPROM Operations.
Read – reading EEPROM *. bin in the printer file.
Write – Record *. bin file in EEPROM printer.
Erase – zeroing EEPROM printer.
Download Current version: 0.9.2
Reset Error E27 Printer Canon MP160
Canon MP160
Canon MP160 adalah printer jenama Canon "semua dalam satu" (All In One Printer) atau multifunction printer. Sebagaimana yang pernah saya terangkan berkenaan dengan masalah counter waste ink yang penuh di sini.
Model MP160 juga mempunyai kiraan sistem kumbahan yang apabila tiba masanya ia akan mengeluarkan isyarat E27 dan semua aktiviti mencetak akan terhenti dan sebarang arahan cetakan daripada komputer tidak berlaku. Isyarat E27 ini dipaparkan di skrin panel secara berkala bermula daripada "E" kemudian "2" dan kemudiannya "7". Komputer akan memaparkan pesanan printer bermasalah seperti Waste Counter Full. Jika anda mengalami masalah ini, sila lakukan cara dibawah ini.
Anda dikehendaki melakukannya dengan kerjasama dua tangan kerana ia melibatkan kombinasi serentak butang panel. Awas: Kekadang butang panel ON/OFF printer model ini mudah lekat atau tersangkut kerana rekaannya yang tak berkualiti.
1.Tekan butang ON/OFF untuk mematikan kuasa printer dan jangan mencabut kabel kuasanya. Kemudian sebelum menekan butang ON/OFF kembali, sila tekan butang Stop/Reset terlebih dahulu tanpa dilepaskan dan kemudian teruskan dengan menekan butang ON/OFF juga jangan dilepaskan.
2.Kemudian teruskan dengan melepaskan tekan pada butang Stop/Reset tanpa melepaskan tekan pada butang ON/OFF. Perhatikan pada butang ON/OFF (ingat jangan lepaskan butang ini), ketika ini butang ON/OFF akan hidup lampu hijaunya.
3. Seterusnya tekan kembali butang Stop/Reset sebanyak 2 kali (perhatikan ketika operasi ini lampu Alarm akan menyala warna oren mengikut jumlah tekanan iaitu sebanyak 2 kali).Kemudian lepaskan tekan pada butang ON/OFF. Ketika ini screen nombor akan menunjukkan nilai "0".
4.Seterusnya tekan butang Stop/Reset sebanyak 4 kali (perhatikan ketika operasi ini lampu Alarm juga akan menyala warna oren mengikut jumlah tekanan iaitu sebanyak 4 kali).
5. Seterusnya anda berada dilangkah yang terakhir iaitu tekan butang ON/OFF selama 3 saat sekali untuk mematikan kuasa printer. Kemudian hidupkan kuasa printer kembali dengan tekan butang ON/OFF kembali.
6. Anda telah berjaya menghapuskan kiraan sistem kumbahan ink dan Error E27 akan lenyap.
Prosedur yang sama juga boleh dilakukan kepada model MP145/110.
*Ingat prosedur di atas hanya untuk menghapuskan kiraan sistem kumbahan sedangkan penyerap kumbahan anda perlu menukarkannya dengan yang baru kerana ditakuti lama kelamaannya tangki kumbahan ink akan melimpah keluar. Bagaimanapun anda boleh memulakan kerja mencetak buat seketika selama beberapa bulan antara 2-3 bulan sebelum menukar penyerap kumbahan dengan yang baru.
LINK OF FREE SOFTWARE DOWNLOAD FOR YOUR PC
1. Windows 7 tweak tool : http://depositfiles.com/files/yxs45u0gw
2. Firefox 3.6 : http://depositfiles.com/files/73awe7fwh
3. Birthday reminder : http://depositfiles.com/files/iij34dg4r
4. Trojankiller portable : http://depositfiles.com/files/5z6emzbkf
5. Advance uninstaller free : http://depositfiles.com/files/ajhjqsfdy
6. Ccleaner tool : http://depositfiles.com/files/h8vffhdkl
7. KAV remover tool : http://depositfiles.com/files/h8vffhdkl
8. TCPOptimizer tool : http://depositfiles.com/files/nrt6kovz5
collection of registry settings which I have recently encountered that you may find useful.
1. Enable Unsolicited Remote Assist
Unsolicited remote assist is very handy for troubleshooting problems on a remote computer where you don't have some other form of remote control such as VNC. I've found that enabling it through the UI doesn't always allow it to work, and you get some cryptic errors. These settings seem to really get it going.
HKEY_LOCAL_MACHINE\SOFTWARE\Policies\Microsoft\Windows NT\Terminal Services
fAllowUnsolicited = 1
fAllowUnsolicitedFullControl = 1
HKEY_LOCAL_MACHINE\SYSTEM\CurrentControlSet\Control\Terminal Server
AllowTSConnections = 1
fDenyTSConnections = 0
fAllowToGetHelp = 1
2. Increase Desktop Heap
Sometimes opening a lot of windows or tabs in Internet Explorer pushes use of the heap (a section of memory used by the desktop.) When you bump up against the limit, strange things start to happen. This blog post details a way to increase it which gives you more headroom.
3. Allow Popups on Secure Sites
Internet Explorer's popup blocker is pretty handy most of the time. But when you're connected to a secure web site you may want it disabled because the popups are part of the user interface for the site (such as for authentication.) This setting allows popups on HTTPS sites.
HKEY_CURRENT_USER\Software\Microsoft\Internet Explorer\New Windows
Allow HTTPS = 1
4. No LAN Manager Hashes
An oldie, but a goodie. This entry prevents the system from storing LAN Manager password hashes which are much less secure than Kerberos or NT hashes. Older systems such as Win 98 and ME won't be able to authenticate, but that's actually a benefit.
HKEY_LOCAL_MACHINE\System\CurrentControlSet\Control\LSA\Parameter
NoLMHash = 1
5. Disable Shaking
This one is a personal taste thing. I don't like the shaking feature of Aero in Windows 7, I seem to activate it all the time on accident (perhaps I have muscle spasms.) Here's a way to disable it.
HKEY_CURRENT_USER \ Software \ Microsoft \ Windows \ CurrentVersion \ Explorer \ Advanced
DisallowShaking = 1
6. Screen Saver Grace Period
The default setting for the grace period on requiring a password after the screen saver starts may be a bit too short for you.
HKEY_LOCAL_MACHINE\SOFTWARE\Microsoft\Windows NT\CurrentVersion\Winlogon\
ScreenSaverGracePeriod = (number of seconds)
7. Take Ownership Menu
This one isn't as much of a registry setting as it is a shortcut, but it's still handy. If you find yourself needing to take ownership of files a lot, this will be quicker than going through the security tab. It adds a menu item in Windows Explorer when you right click on a file or directory which will give you ownership.
HKEY_CLASSES_ROOT\*\shell\runas
(default) = "Take Ownership"
NoWorkingDirectory = (empty)
HKEY_CLASSES_ROOT\*\shell\runas\command
(default) = "cmd.exe /c takeown /f \"%1\" && icacls \"%1\" /grant administrators:F"
IsolatedCommand = "cmd.exe /c takeown /f \"%1\" && icacls \"%1\" /grant administrators:F"
HKEY_CLASSES_ROOT\Directory\shell\runas
(default) = "Take Ownership"
NoWorkingDirectory = (empty)
HKEY_CLASSES_ROOT\Directory\shell\runas\command
(default) = "cmd.exe /c takeown /f \"%1\" /r /d y && icacls \"%1\" /grant administrators:F /t"
IsolatedCommand = "cmd.exe /c takeown /f \"%1\" /r /d y && icacls \"%1\" /grant administrators:F /t"
8. Disable Simple File Sharing
Simple file sharing in XP makes remote administration a bit difficult, mainly by disabling the admin shares (ADMIN$, C$, D$, etc.)
HKEY_LOCAL_MACHINE\SYSTEM\CurrentControlSet\Control\Lsa
forceguest = 0
9. Disable Writing to USB Drives
This is a helpful security setting if your organization wants to disable writing to USB drives on certain machines.
HKEY_LOCAL_MACHINE\SYSTEM\CurrentControlSet\Control\StorageDevicePolicie
WriteProtect = 1
10. Default User Settings
This is more of a tip than a setting. If you need to restore a key in HKEY_CURRENT_USER to its default, you can find them all in HKEY_USERS\.DEFAULT. This is also handy if you want to change a setting that will be used for all new user accounts because it is used as a template for each new user's registry settings.
Sunday, March 28, 2010
How to access the sharing data offline
Access the shared data offline allows you to keep using your shared files, folders and software programs when disconnected from the data server. When you reconnect to your data server, all files will be synchronized to the files on the network.
There are two types of configurations required to set the access shared folders offline available, one for data server and other for client computer.
Configuration on Data Server.
First locate the folders that you would like to share or make new folders then share these folders so they can be accessible to any one on the network.
Now right click on that folder and click on the option "Sharing and security".
Now set the share level permissions that you want to give the users on every folder. Enable cache of share folders by click on cache button (by default it will be enabled).
Configuration on Client Computer
On the client computer, first open My Computer then click on Tools.
In Tools menu bar, click on Folder Options, a window will appear with the title Folder Options.
Under the Offline File tab, check the option Enable Offline File. Here you can choose the synchronization process "Synchronize all offline files when logging on", "Synchronize all offline files before logging off" and others.
Click on Apply button to save the settings and then Ok button to close this window.
Now sitting on the client computer, try to access the shared folder from the data server.
First Right click on the shared folder and Click on Make available offline.
To synchronizing the offline work from client computer to data server, again open My Computer then click on Tools. Click on Synchronize then click on synchronizing button.
Subscribe to:
Posts (Atom)